Saturday, April 03, 2010

Day 25 (Parts back, Time to get started)

Okay, so I swaped the parts for the car today. It looks like it will be a few days before I see the girl again so I have to get the parts done before she gets back. We can see the what the parts look like now after the sandblasting. Each part had some damage to it. Mostly minor except a few.

Doors Outside:


Doors Inside:


Door Handle Damage Outside Driver:


Door Side View Mirror Damage Outside Driver:


Door Skin Damage Outside Passenger:


Door Handle Damage Outside Passenger (minor crack):


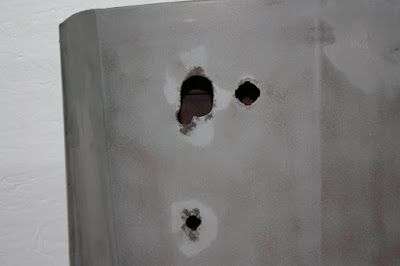
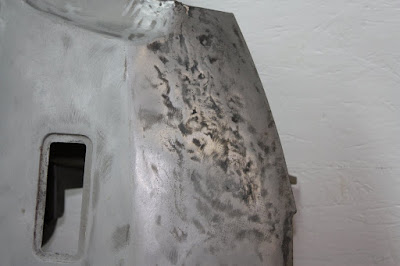
How to F*$% UP A DRIVER DOOR STRIKER PLATE:


How to REALLY REALLY F*$% UP A PASSENGER DOOR STRIKER PLATE:


Hood Outdside:


Hood Inside:


Hood Damage Outside Driver Front:


Hood Damage Outside Driver Rear:


Fenders Outside:


Fenders Inside:


Fender Damage Outside Driver:


Fender Damage Outside Driver 2:


Fender Damage Outside Driver 3:


Fender Damage Outside Driver 4:


Fender Damage Outside Passenger:


Deck Lid Inside:


Deck Lid Damage Inside Driver:


Deck Lid Damage Inside Passenger:


Deck Lid Outside:


Now that the parts are back its time for some POR-15 under coating. This is somewhat of a super strong rust preventive paint. The best part is that it can be brushed on by a paint brush. This seemed easy in my mind, however, trying to fit a paintbrush in a door shell proved to be quite difficult. I went ahead and painted the inside of the 2 inner fenders and the inner doors. I did make a mess of a few areas. I should have maked off ALL the holes as paint seeped out of a few holes here and there. I will have to clean these up tomorrow before I shoot the primer.


Thursday, April 01, 2010

Day 24 (Steering Gear and a blast)

GOOD MORNING! I am excited, can you tell? Today I took the fenders, deck lid, hood and doors over to the media blaster this morning, which happens to be located about 6 blocks from my house. I know what you’re thinking, “but what about the car?” and I’ll tell you. This is by design. I am having the parts media blasted first, and then once they are done I am going to swap them for the car. This leaves half of my garage open so I can primer the parts first and let them set up. Once the car is back I can load into the garage and primer it right away with the parts already done.
When I got home today, I went straight to the garage to remove the steering gear and finish removing the brake lines. I called my dad earlier and ask for advice regarding the steering gear and said bolt it back on and hit it with a hammer. So I did but it didn’t work. So I did what any good mechanic would do … I got a huge sledge and smashed the living hell out of it. Turns out that did the trick. The bearing came loose and I could easily remove the steering gear. In my new found excitement I focused on the brake lines and had them removed in no time. The car is now ready for media blasting .. WOOT!...

Before the Blast:

Fenders Outside:


Fenders Inside:


Doors Outside:


Doors Inside:


Hood Outside:


Hood Inside:


Deck Lid Outside:


Deck Lid Inside:

Day 23 (Shocks & Lines and one stubborn wheel)

Today Grant and Lenny stopped by and gave me a hand with a few things. Thank god they did, because I ran into a pretty serious problem that could only be solved by having all 3 of us there. It started out easy enough, Grant removed some left over rear trim, while Lenny and I started working on the removing the steering gear. Grant was successful in removing his part, Lenny and I, well, not so lucky. We decided to leave the steering gear alone and tackle the shocks.
I decided it would be a lot easier to remove the shocks if we removed the wheels first. In attempting to remove the passenger front wheel we had a small issue. Grant kept turning on the one lug nut and it just kept turning without loosening. We tried to tighten it, same thing. It just kept turning. This meant that the stud that was pressed through the axle plate was stripped. Also since there was no way to get behind said stud, we were stuck.
We tried pulling on it, pushing on it, turning the wheel each way. Then a Hail Mary idea, if we put tension on the wheel equally pulling in the direction of removing the wheel, we should be able to cause enough tension on the stud to make it to grab on the interior of the axle plate. With Grant on one side and me on the other we wedged crowbars between the wheel and the drum brake hub and pried for dear life while Lenny used the tire iron to turn the lug nut. After about 2 mins, we found some success. It was another 20+ minutes to get the rest of the lug nut off and subsequently the wheel and I then removed the bad stud.
After this colossal battle we got back to work, the shocks were removed as well as the brake lines, Grant cut out the manual/parking brake cable. The fuel line was removed along with some really old fuel that was still in the line. As matter of fact I think it’s starting to make me a bit woozy…. *WAM*.